Introduction
Currently, there is a lot of hype around WSL and WSL 2 on Windows. It allows us to run almost any Linux application, including Docker. It even allows us to develop applications for Linux in VS Code using the "Remote - WSL" extension. But the goal of this article isn't to praise WSL but to show that there is a better way to use Docker on Windows.
Let's start from the beginning. Docker allows you to build and run Linux Containers (Windows too but we will not talk about it right now) in a very straightforward way - all you need is to put some build instruction in a docker-file, build the image using the "docker build" command and run the container using "docker run." But how does docker run a container on a Linux/Windows machine?
"The Docker on Linux" Way
When you use Docker on Linux, it simply uses native kernel features, like cgroups, to run the code inside the container. As the result, it's lightning-fast because it doesn't use any emulation (e.g. in contrast to Virtual Box).
"The Docker on Windows" Way, Part 1 - Hyper-V
When you use Docker Windows and it doesn't have WSL2 installed, the default backed is Hyper-V. After the installation, Docker asks you to activate it and reboot your machine. It is doing this because it uses Hyper-V to run a small virtual machine on it. Because there is no magic - you can't run Linux executables natively on Windows. Interestingly, If you use Virtual Box on the same machine then it may become slower or stop working at all. Because what happens when you activate Hyper-V - your copy of Windows became some kind of a Virtual Machine (the host OS) that also runs on top of the Hyper-V virtualization layer. And when your run Virtual Box it's somewhat similar to starting a VM inside another VM. It's not completely similar, because the latest versions of Virtual Box can use Hyper-V as their emulation backend. But be aware that in order to use it your machine should support Hardware Virtualization.
"The Docker on Windows Way", Part 2 - WSL2
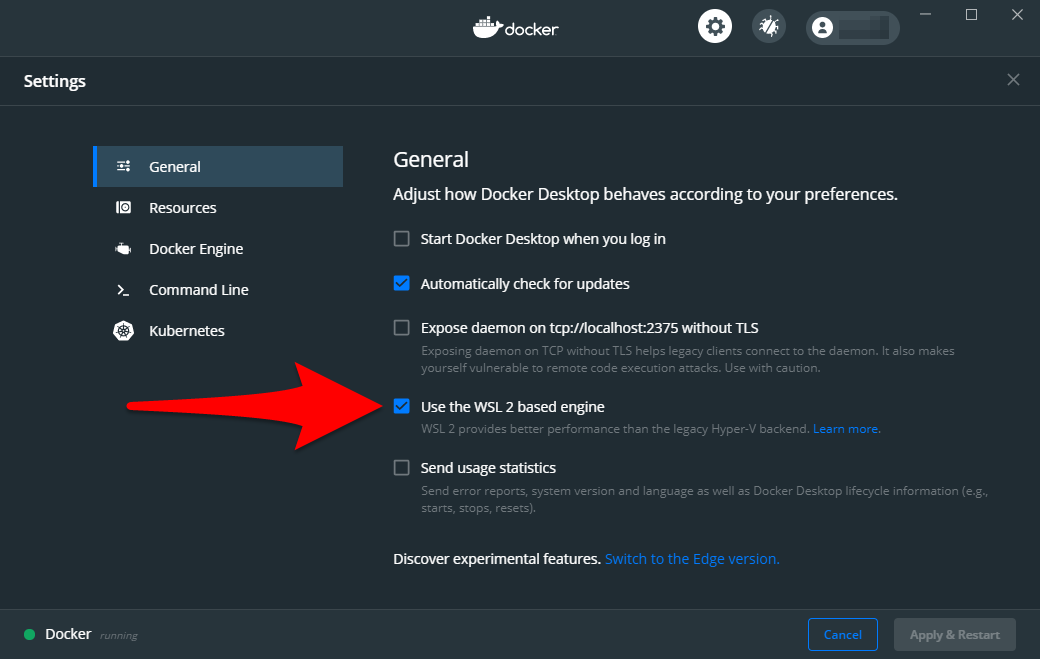
The first time I heard about the possibility of running Docker on WSL2 I was happy as a child. Running without Hyper-V with performance, batter than the performance of WSL1, isn't it cool? Well, it would be cool if WSL2 didn't rely on virtualization technology. It requires you to enable the "Virtual Machine Platform" feature of the latest builds of Windows 10. And as far as I can understand it is similar to running under Hyper-V. So, no benefits here. Almost. But it may change in the future. For now, it seems more like a marketing trick. For now, it even has a bug that prevents docker from reclaiming the memory from WSL it. One day while I was working building images with Docker on WSL2 I noticed that the process was using more than 10BG of memory! But this feature is still in beta and hopefully become better over the years. So, how can you enable it? First of all, install and WSL2 as described in the official documentation here. Then tick the following checkbox in the docker settings:
"The Docker on Windows" Way, Part 3 - WSL1
There is also an option to run Docker on WSL1 using an older version (it won't work with the latest ones). All you have to do is to install that specific version inside any WSL1 distribution and start to use it. But then you became limited to that version, and when you run a container, it will always use around 30% of your CPU, even if the container is doing nothing. So, you can try it or even use it, especially if you have a powerful desktop PC. But it's certainly not the best way to use Docker on your laptop due to increased power consumption and overheating.
"The Docker on Windows" Way, Part 4 - Virtual Box
This way is primarily designed for those who don't have the hardware virtualization feature on their PC. All you have to do is to install Virtual Box on and then install a specific version of Docker called "Docker Toolbox." Docker Toolbox also uses a small virtual machine but instead of running it on Hyper-V (which requires the virtualization) uses Virtual Box. It has its limitations, but I love it because it provides some benefits even when you do have the hardware virtualization support. Why? Because, because then you can disable Hyper-V and all other Windows Virtualization Features. It will allow you to run Virtual Box at full speed and also make your system a bit more responsive. You can read more about it in the official Hyper-V documentation in the "limitations" section here.
"The Docker on Windows", The Better Way
This way is a bit unusual and may not be suited for everyone, but I'm suggesting you reading to the end because there is a good chance you'll love it as much as I do.
All options mentioned above can be pretty good, and some of them are official ways of running Docker on Windows. But what all those ways require you to modify your system, and sometimes it may be undesirable. For example, when you use Hyper-V it may make your system a bit unstable as described above. Also, when your run Docker Desktop, let's say, on your laptop, it uses its resources during builds and for running containers. Sometimes it can slow you down. Needless to say, that when you build containers locally, it may use quite a lot of system disk space, and you should keep an eye on the size of the local images because it can grow pretty quickly. Mine was around 100GB one day, and it took a couple of hours to understand why and how to clean it up. So, what is the better way?
It's "Docker on Raspberry Pi" way. Recently, I bought a Pi4, connected it to an external 2TB drive with USB 3, and configured a samba (Windows Share) service to expose it to the local network at home. I was tinkering with it, and, accidentally, decided to try to run a Minecraft server on it. I quickly build an image on my windows laptop with Docker Desktop on WSL2, pushed it to the Docker Hub, and tried to run it on the Raspberry Pi. But I quickly realized that it was failing with the following error:

As it turned out, Docker builds images with the same processor architecture under which it's being built. In the case of "Docker on Windows," the resulting architecture of an image is x86_64. In the case of Raspberry Pi 4 and Ubuntu (64 bit), it's aarch64. We can verify it by running the "uname -m" command on a Raspberry Pi:

The next step was to build the image on Raspberry Pi. Only then I realized that I should build images on the Raspberry Pi itself. I didn't use any git repositories for this quick project; and because my samba server had been already configured on my Windows laptop, all I have to do was to copy project files with the Dockerfile to a folder on the connected Network Drive (samba share).
So, I build the image once again on the Raspberry Pi. It succeeded, but then I've got a similar error. However, the error occurred not during a container startup, but on during Minecraft server startup:

Why a similar error? Didn't I build it with the required architecture? To completely understand this error, you should know that a Minecraft Bedrock Edition Server is only available for Linux with x86_64 architecture (64 bit). And I was downloading it during the image build using wget. The resulting architecture of the image was aarch64, but I was trying to run x86_64 executable on it. It's somewhat similar to trying to run a Visual Studio executable from Windows on the phone. The only way I found to make it work is to use an emulator. And so, my journey with Docker on Raspberry Pi and QEMU began. But I won't describe it here. The only thing I mention about it here is that I'd got it working, but it was to slow to use even for a single player. Because the goal of this article is to show you the beauty of working with "Docker on Raspberry Pi." Later that day, I opened the Visual Studio Code in the shared folder on the Raspberry Pi. And I was a similar (or even better) experience of running Visual Studio Code with the "Remote - WSL" extension. But because I was using Docker on a Raspberry Pi and connected to it via ssh, my laptop was using 0% CPUs during docker builds, its SSD was completely clean from temporary image layers, and all containers were running outside the main machine allowing it to be as responsive as possible.
Setting Up "Docker on Raspberry Pi"
Now, lets set it up from the beginning. First of all, we have to enable cgroups (it wasn't enabled by default on Ubuntu 20, x64 for me) by editing "cmdline.txt". We can open it in vim with:
sudo vim /boot/firmware/cmdline.txt
Next, we should append the following configuration to the first line (e.g. by pressing Shift+A and entering:
cgroup_enable=cpuset cgroup_enable=memory cgroup_memory=1
Save it and quit from vim by pressing :wq<Enter>. The next step is to reboot the Raspberry Pi to apply the changes:
sudo reboot
Now, we are ready to install docker:
sudo apt update
sudo apt upgrade
sudo snap refresh
sudo snap install docker
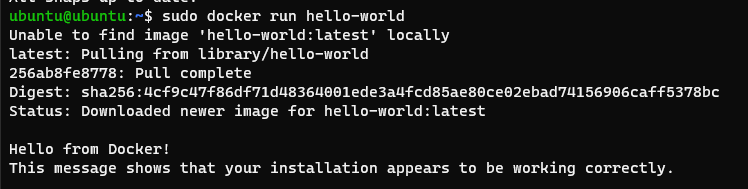
We can verify that it's correctly installed by running:
sudo docker run hello-world
The output should look something like this:
The next step is to enable samba service to access project files easily on a Windows machine:
sudo apt install samba
Let's say, we would like out code to live in ~/code (e.g. /home/ubuntu/code):
mkdir ~/code
In order to configure samba server on the Raspberry Pi and share ~/code folder we have to edit smb.conf file:
sudo vim /etc/samba/smb.conf
First of all, modify the "global" section. Mine looks like this:

and create a new share by appending it's configuration at the end of a file. It may look like this:

Notice, here we configured ubuntu as our user. But we can specify any user name here, not just ubuntu. Samba users are not the same as system users. For simplicity, we can even enable public access without a password by setting "public = yes." Save it and quit from vim. Now we should add our ubuntu-samba user and generate a password for it:
sudo smbpasswd -a ubuntu
To apply the changes, we should restart the samba service:
sudo service smbd restart
To verify that our service is working fine we can run the following command:
sudo systemctl status smbd

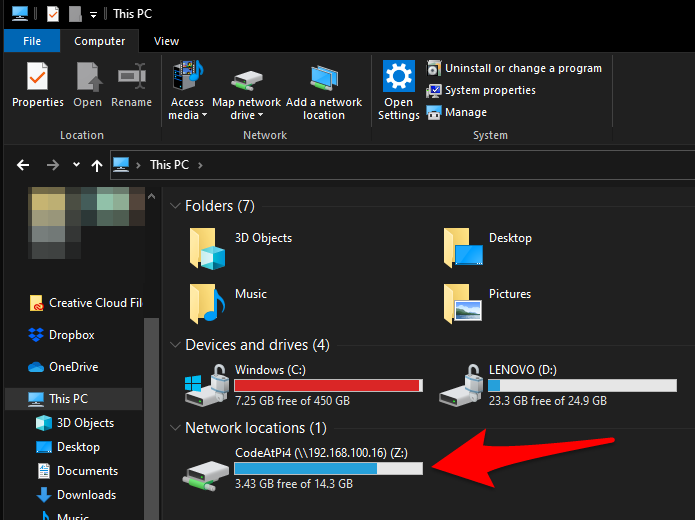
If it's active then we didn't mess with samba.conf and are ready to connect to the samba service from Windows. Notice, I'm assuming you are familiar with your network configuration. At this point, it would be almost essential to assign a static IP address to your Raspberry Pi on your router. I assigned 192.168.100.16 for mine. It will allow you to easily restore the network drive connection to Raspberry Pi each time your laptop is booted and connected to the local network.
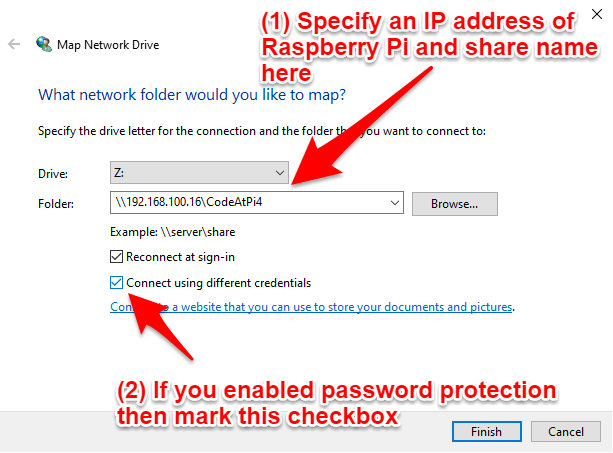
All we have to do is to open the Windows Explorer and press the "Map Network Drive" button:

specify required options and press finish:
enter credentials for the ubuntu user (the ones you've added using smbpasswd):

and viola, now we can access our share from Windows as it was a regular drive:
From here we can clone any git repository using PowerShell, and then open it in Visual Studio Code. For example:
git clone https://github.com/docker-library/hello-world
cd hello-world
git reset --hard 9ef4804c28679a416a445397f9b2e2b105005151
code .
To verify it's working, open hello.c file, and add/modify any text you want. For example:

and remove those lines from Dockerfile.build (on the moment of writing this article those packages were unavailable on Raspberry Pi, Ubuntu 20, x64):

and delete all blocks that starts with "RUN set -ex" except this one:

and change CMD line from amd64 to arm64v8:

and save the changes. Then switch to the Raspberry Pi (I'm ssh-ing to it) and run the following commands:
cd ~/code/hello-world
sudo docker build -t hello:latest -f Dockerfile.build .
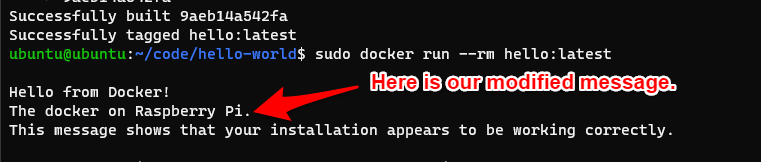
sudo docker run --rm hello:latest
And here is our modified message:
Isn't that cool? Now, you can work on your docker projects on a Windows machine without the need to have Docker installed.
Summary:
So, what is the "Docker on Raspberri Pi" way about? It's about isolating your personal/professional environment from the Docker itself, quickly iterating using shared folders on a Raspberry Pi filled with your project files and git repositories, and using your preferred code editor opened on your favorite machine. And it's about freedom of choice.
Pros:
- It doesn't rely on Hyper-V, WSL2, or any other virtualization technology.
- It doesn't take any memory and processing power on your main laptop.
- You can easily bring it to your office.
- No need to pay for a separate VM and compute resources.
- Easy to use.
Cons:
- Resulting images are compiled to aarch64 (arm64) architecture and can't be run on a laptop (unless you use buildx or an emulator).
- Computing resources of Raspberry Pi are limited.
- Some libraries may not be available on aarch64.
- Relatively hard to configure.
Thanks for reading and happy coding.